|
|
THE KIWI-SDR AS A SHORT- AND MEDIUM WAVE DRM RECEIVER
|
|
Recently a new method to listen to DRM broadcasts emerged by using the Kiwi SDR. The newer versions of the popular Web-based SDR has the IQ output option implemented. With the help of the KiwiSDR Software-defined receivers around the world you can tune in to digital shortwave DRM radio stations anywhere. Even if you cannot receive any DRM transmitters where you live, the KiwiSDR makes it possible. All you need is to install a VAC (Virtual Audio Cable) to hook up its audio output to DReaM, SoDiRa or whatever you use.
First of all you need to get a Virtual Audio Cable and install it on your PC. There are various VAC available which you can download.
Before you start a KiwiSDR close both DReaM and your web browser and do some initial steps how to handle the audio in your computer.
|

Fig. 1
|
In Windows XP, open your speaker settings and set the default audio output to VAC instead of your PC speakers. Go to "Sounds and audio devices properties", "Audio", select VAC from the drop-down list in "Default Device". Then click "Apply" and "OK".
|
|
|

Fig. 2
|
In Windows 10, first open your speaker settings by pressing and holding the Windows key and type "S". Then type "Sound Card Settings" in the Search Windows box. Click on the "Best match" result ("Change Sound card settings") and "Sound" opens. Under the tab "Playback", select "Cable input, VB-Audio Virtual Cable" and click on "Set Default", then click "OK" to set the default audio output to VAC instead of your PC speakers.
|
|
|

Fig. 3
|
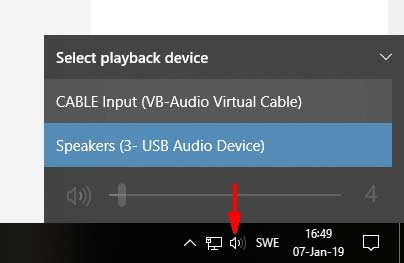
In Windows 10 version 1803 and higher it is even easier, just click on the speaker icon and then click on the "^" symbol, then select the Cable Input (VAC) instead of your PC speakers.
|
|
|
|
Start Dream with a shortcut or a run command exactly like this (it looks like this on my PC): "C:\Dream\dream.exe" -c 5 . Note that I had to use quotation marks in this shortcut. Without the quotation marks the ' -c 5' will be ignored.
With Dream, go to "Settings" / "Sound Card" / "Signal Input" / "Device" and select "VB-Audio Point" (in my case the VAC is called that) to set DReaM to use the VAC as its audio input.

Fig. 4
|
|
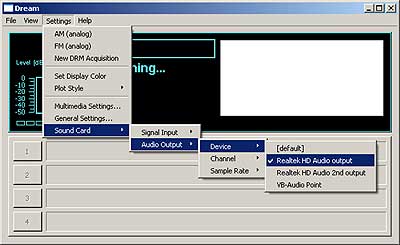
Then, again in Dream go to "Settings" / "Sound Card" / "Audio Output" / "Device" and check (in my case) "Realtek HD Audio Output" (or whatever you have) to route Dream's output to your PC speakers.

Fig. 5
|
|
|
|
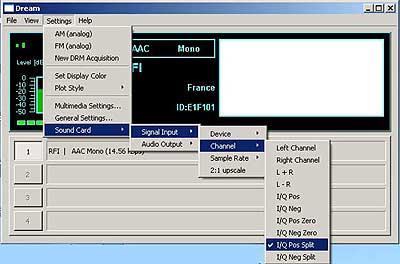
Finally in Dream again, place the Input Spectrum in the middle of the Dream by going to to "Settings" / "Sound Card" / "Signal Input" /"Channel" and
check "I/Q Pos Split".
|

Fig. 6
|
|
|
|
Start your web browser and find a KiwiSDR web receiver. Tune in a DRM transmission and press the "I/Q" button. Now Dream should play the decoded audio from your PC speakers.

Fig. 7
|
|
|
|
On most (if not all) KiwiSDR web pages there is a Maidenhead grid locator. In the newest version of the DRM-Log Plotter from November 2017 this locator can be written to "My Locations" in the DRM-Log Plotter. Goto "SetUp" / "Receiver Coordinates" / "Change" which opens the "My Locations" window. Write the Maidenhead Grid Square Locator in the "Add Location" field. The locator should be written like "AB12cd", but you can write the locator anyway you want - it will be fixed automatically. Press the "Convert" button and the Latitude / Longitude coordinates will be calculated and added to the boxes automatically. Press "Add" to add this locator to your "Locations" list. This way you will get the actual distance and azimuth to the transmitter site.

Fig. 8
|
Latest edit: 8th January 2019, reviewed 23rd October 2021
|
|

